
コロナ対策用にRaspberry PI3、及びLEPTON3.5、Bionic12以上のCPUを持つiPhone又はiPad限定の機能です。本来のLEPTON3.5は温度測定精度が±5度又は5%となっていて、実際、同一点を測定するとかなりの変化が見られます。つまり体温測定には不向きです。
New feature for COVID-19 but you need Raspberry PI3, and LEPTON 3.5, iPhone 11, 11 pro and iPad Pro(2020). LEPTON 3.5 Raw data has a temperature accuracy of ±5 degrees or 5% as following chart. it is not suitable for measuring body temperature.

LEPTON3.5で、37.5℃の黒体炉を約40分にわたって測定しています。横軸が0.5℃ピッチなので、同一ポイントで3℃以上の開きがあることが分かります。
そこで画面上で温度変化の少ないポイントを記憶させ、時間の経過とともに変動する数値を画像単位で補正するという発想が生まれました。結果的に±0.25℃程度の精度を保たせることができます。
We measured the black body furnace at 37.5°C with LEPTON3.5 for about 40 minutes. Since the horizontal axis is at a 0.5°C pitch, we can see that there is a difference of 3°C or more at the same point. This is
The point at which the temperature changes little is stored on the screen, and the value that changes over time is shown in the image.This idea of compensating in units was born. As a result, it is possible to maintain an accuracy of about ±0.25°C. And other commercial products for Microborometer are also the same system.

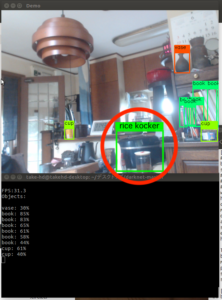
このグラフは今回のPI3を使ったLEPTON3.5の測定結果です。対象測定物が国産の電気釜の保温中の表面温度です。横軸が0.2℃ピッチです。LEPTON3.5でも素晴らしい精度になることがおわかりいただけると思います。電気釜なので大きな波で温度が上下していることも分かります。この電気釜も素晴らしい保温性能ですね!
この温度測定機能に、マスク着用を含めた赤外線画像の顔認識機能を取り入れたものが、今回のシステムです。
原理上基準点は温度変化のない場所が理想ですが、石膏ボードを使用した壁や天井、水槽、発泡スチロール版などを利用しても、かなりの精度が維持できることが分かっています。高度な顔認識AIを組み入れたシステムとしては非常に低価格に押さえられることになります。
This graph shows the results of the LEPTON 3.5 measurement using the PI3 in this case. This is the surface temperature of my rice cocker. The horizontal axis is 0.2℃. You can see that LEPTON 3.5 is also very accurate. I think you can get it. It’s an electric kettle so you can also see the temperature rise and fall in large waves. This electric rice cocker system is also precisely keeping warm too !
The new system is a combination of this temperature measurement function with the face recognition function of thermal images as well as face with a mask.
In principle, the ideal reference point is an area where there is not much change in temperature, but it is also possible to measure the temperature of walls and ceilings made of gypsum board, water tanks and Styrofoam. We’ve found that the system can maintain a fair amount of accuracy.
This means that the system can be a very low cost without the black body furnace for a system as AI(image recognition.)
黒体炉(温度基準器)を使って基準温度を設定すると精度が上がります。下記ビデオ参照。
Accuracy is improved by setting the reference temperature using a blackbody furnace(Temperature Calibrator). Refer to following video.
黒体炉がなければ、空調の効いた部屋の壁や発泡スチロールも使えます。安定しているので10−20分程度。
10−20分毎に自分の体温を測ってメモリーポイントに設定してください。
下記ビデオを参照ください。
if you do not have any standard as same as blackbody furnace, you can try wall, Styrofoam etc. in well air-conditioned room, which is stable for 10-20min.
you can calibrate every 10-20 min instead.
for your understanding, please refer to following video.
For Raspberry Pi 3+ software and instruction, please refer to following GitHub.
(1) ESP8266とRaspberry PIの切り替え
「設定」からThermal Cam3Xを選択して以下のように ESP8266=ON PI=OFF をONにし、Yolo ON をONにします。
(1) Switching between ESP8266 and Raspberry PI
Select Thermal Cam3X from “Settings” and set ESP8266=ON PI=OFF to ON and “Yolo ON” to ON as shown below.

(2) マスクを含めた顔の学習済みデータのダウンロード
ロゴボタンを押して、表示されたWEB画像下部(d)のデータ(マスクを考慮した顔認識)をダウンロードし、Thermal Cam3Xフォルダに移動し、解凍します。他のw_tフォルダが存在している場合は消去又は移動して下さい。
(2) Download Pre-learned data of face with mask.
Press ②logo button to download the data (face recognition considering the mask) at the bottom (d) of the displayed WEB image, move it to the Thermal Cam3X folder, and decompress it. If another w_t folder exists, delete or move it.
Pre-learned data of face with mask
(3) Raspberry PI側アプリの起動
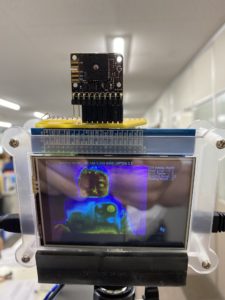
様々な起動方法が考えられますが、この場合は同一無線ルーターに、PI・Mac・iPhoneを接続して、Macのターミナル画面からSSHを使用してPIに接続、iPhoneのiPアドレスを指定してPIアプリを起動してみました。もちろんPIにキーボードを接続すれば、PI本体からの起動もできます。
(3) Start Raspberry PI application
There are various possible startup methods, but in this case, connect PI, Mac, iPhone to the same your wireless router, connect to PI using SSH from the terminal screen of Mac, specify iP address of iPhone I started the PI application. Of course, if you connect a keyboard to PI, you can also start from PI itself.
Mac

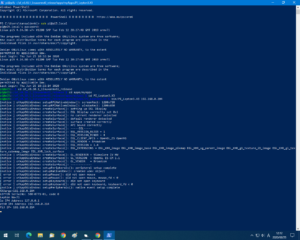
Windows(WIondows PowerShell)

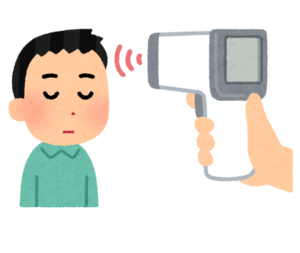
(4) 基準となる人の体温測定(測定を実施する人)
(4) Measuring the body temperature of the reference person (the person who performs the measurement)

OR
(5)基準ポイント(メモリーポイント)測定画面の表示
PIのアプリが起動して、PIとiPhoneが接続されていれば、画面右下の黒ボタンを押すことで、メモリーポイント設定画面に画面が切り替わります。
新たにメモリーポイント指定カーソル(赤丸)が現れます。
メイン画面:画像内側にメモリーポイントカーソル(赤丸)の移動範囲を示すグレーの四角形が表示されます。
UI画面:新たに4つのボタンが追加されます
Color range:今までのカラーレンジ設定と同じ動作です
Cursor:メモリーポイントの固定と解除を行います
Emissivty:放射率の変更を行います
M+:CursorのM+ボタンを押すことで、さらにスライダーが現れます.
(5) Display of reference point (memory point) measurement screen
If the PI app starts and the PI and iPhone are connected, press the black button at the bottom right of the screen to switch to the memory point setting screen.
A new memory point specification cursor (red circle) will appear.
Main screen: A gray rectangle indicating the moving range of the memory point cursor (red circle) is displayed inside the image.
UI screen: 4 new buttons are added
Color range: Same operation as the previous color range settings
Cursor: Fix and release memory points
Emissivity: Change the emissivity
M+: Press the M+ button of Cursor to display a slider.

(6)体温を測定した人の顔認識と表面温度確認
実際に体温計で測った温度とどのくらい違うかを確認します。
(6) Face recognition and surface temperature confirmation of person by measuring body temperature
Check how different it is from the temperature actually measured by the thermometer
(7)誤差がある場合は体温となるべく近くなるよう放射率を調整
(7) If there is an error, adjust the emissivity so that it is as close to the body temperature as possible.

Emissivityボタンを押すと放射率選択用のピッカービューが表示されるので、測定した体温に一番近くなる様放射率に変更します。すぐに表示温度が反応するので一番近くなった所で黄色のボタン(Done)を押します。ここで1~2℃違っていても微調整可能です。
When the Emissivity button is pressed, the picker view for emissivity selection is displayed. Change the emissivity so that it is closest to the measured body temperature. The displayed temperature will respond immediately, so press the yellow button (Done) when it is the closest. Fine adjustment is possible here even if it differs by 1 to 2°C.
(8)メモリーポイントの指定
測定の邪魔にならず、温度変化のない場所にメモリーポイントカーソルを移動して、M+ボタンを押します(この画像の場合は左上の壁)。一度LEPTONのキャリブレーション(シャッター開閉)を行うので2秒ほど待ちます(この間、温度調整用のスライダーが表示され、黄色に変わりアニメーションします)
赤丸カーソルは緑に変わり、以降ACボタンを押さない限り移動できなくなります。
新たに中央に任意温度測定用のカーソルが現れます。そして、顔を認識している場合には十字カーソル範囲の最高温度も表示します。
(8) Specifying memory points
Move the memory point cursor to a place where the temperature does not change without disturbing the measurement, and press the M+ button (in the case of this image, the upper left wall). Wait for about 2 seconds as LEPTON is calibrated (shutter open/close) once (during this time, a slider for temperature adjustment is displayed and changes to yellow and animates)
The red circle cursor will turn green and you will not be able to move it until you press the AC button.
A new cursor for arbitrary temperature measurement appears in the center. When the face is recognized, the maximum temperature in the cross cursor range is also displayed.

(9)メモリーポイント指定後基準測定者の体温をスライダーで微調整
体温計で測定した温度に近づく様にスライダーを調節します。M+の横に表示されるオレンジの数値はメモリーポイント温度の変化を表します。(メモリーポイントが黒体炉のように温度が一定のものであれば、このオレンジの数値を黒体炉の温度に合わせます。LEPTONから黒体炉までの距離と同位置に計測ポイント(顔)があればその計測ポイントは正確な温度と言うことになります。混乱するのでこの説明は別の機会にします)
(9) After specifying the memory point, use the slider to finely adjust the body temperature of the reference measurer.
Adjust the slider so that it approaches the temperature measured by the thermometer. The orange number displayed next to M+ indicates the change in memory point temperature. (If the memory point is a constant temperature like a blackbody furnace, adjust the orange value to the temperature of the blackbody furnace. The measurement point (face) is at the same position as the distance from LEPTON to the blackbody furnace. If so, it means that the measuring point is the exact temperature. This explanation will be another opportunity because it is confusing.)

メモリー機能は以上の(5)~(9)までの手順が必要ですが、コツがつかめるとかなり簡単に設定できます。
(10)一般画面に戻り体温の測定開始
メモリーポイントの設定が終わったら、右下の黒ボタンを押します。一般画面に戻り測定開始となります。以降ほぼ同じ位置に他の人が立った場合、正確な温度が表示されます。
The memory function requires the steps (5) to (9) above, but it is fairly easy to set if you get the hang of it.
(10) Return to the general screen and start measuring body temperature
When you have finished setting memory points, press the black button at the bottom right. Return to the general screen and start measurement. If another person stands at approximately the same position thereafter, the accurate temperature will be displayed.

測定中、ダウンロードした学習済みデータはAI機能のThermalsが有効になっています。設定方法などについては「AI機能について」を参照して下さい。
ある温度以上の体温の人を検知した場合、英語や日本語、フラッシュやアラームでアラート発生が可能です。標準ではthermals=0.3(0.3℃以上の温度差がある場合はアラーム)となっていますが、36.5℃が標準の場合は1.0程度にしても良いと思います。
During the measurement, the downloaded learned data has the AI function Thermals enabled. Please refer to “AI function” for the setting method.
When a person with a body temperature above a certain temperature is detected, an alert can be issued in English, Japanese, flash or alarm. The standard is thermals=0.3 (alarm when there is a temperature difference of 0.3°C or more), but if 36.5°C is the standard, it may be about 1.0.
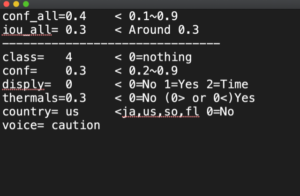
サンプル学習済みデータはグーチョキパーとマスクを含めた顔の認識。つまり4パターンの画像認識が可能です。このデータの意味は40%以上の認識率の場合、全てのクラスのパウンディングボックスを表示。特に顔が(class番号4)30%以上の認識率の場合かつ標準との温度差が0.3℃の場合は英語で”Caution”とsiriがアラートを出します。conf_allは0.3でも良いかもしれません。色々試してみて下さい。
The sample-learned data is face recognition including gouchokipa and mask. In other words, 4 patterns of image recognition are possible. The meaning of this data is to display the bounding box of all classes when the recognition rate is 40% or more. Especially when the face (class number 4) has a recognition rate of 30% or more and the temperature difference from the standard is 0.3°C, “Caution” and siri will alert you in English. conf_all may be 0.3. Please try various things.
————————————————————————————
※ここで説明している方法の他に、黒体炉や蓄熱材を使った方法など、様々なメモリーポイントの指定方法ができます。
※自主試験では、LEPTON設置位置から1mを境にして0.1m当たり約0.1℃の温度差が発生します(50cm近づくと0.5℃測定温度が上昇する)。したがって、体温測定位置はある程度一定であることが必要です。
※メモリーポイントを壁などに設定した場合、時間とともに変化することにご注意下さい。空調の開始時など、室温と壁面の温度差がある場合は、時間の経過とともに誤差が大きくなります。
※LEPTON3.5の精度は±5℃です。メモリーポイントを設定しない場合はこの範囲で表示温度が上下します。また、放射温度計という特性上、対象物の持つ絶対温度を測定しているわけではないことにご注意下さい。
* In addition to the method described here, you can specify various memory points such as a method using a black body furnace or heat storage material.
*In a voluntary test, a temperature difference of approximately 0.1°C occurs per 0.1m from the LEPTON installation position at a distance of 1m (0.5°C measurement temperature rises when approaching 50cm). Therefore, the body temperature measurement position must be fairly constant.
*Please note that if the memory point is set on a wall, it will change over time. If there is a temperature difference between the room temperature and the wall surface, such as when air conditioning starts, the error will increase with the passage of time.
*The accuracy of LEPTON 3.5 is ±5℃. If the memory point is not set, the display temperature will rise or fall within this range. Also, please note that due to the characteristics of the radiation thermometer, the absolute temperature of the object is not measured.