Thermal Cam 3x AI function(Yolo v3 Object Detection)

Our new feature of Thermal Cam
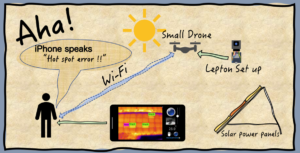
We add object detection for thermography. One of feature for Thermal Cam is night vision and our system is divided display from FILR sensor.
ESP8266 helps to transmit WiFi longer and light weight low battery consumption all at the same time.
Furthermore, various applications are possible by adding image recognition AI.
However, AI function cannot be executed just by downloading Thermal Cam3x application. Please download the Pre-learned file first referring to the following.
New feature ?
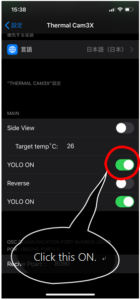
For iPhone Xs, Xs Max, 11, 11 Pro, and 11 Pro Max, the image recognition function works by turning YOLO ON toggle switch at the setting of iPhone.
* 1 The recognition engine uses YOLOv3. Since this is not a Tiny version, it demonstrates excellent recognition ability.Pre-learned files can be freely selected, and the weight data prepared by the user.
* 2 Using the recognition results, the user can freely set Siri voice in English or Japanese, alarm, camera flash and display number of objects recognized, time stamp.
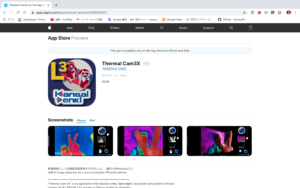
* 3 You can freely change the above alert and the text of the target object (hereinafter referred to as Classification). This requires a general text file edit software. Although it is a paid application, it is recommended to install “Textor” in advance. “Textor” on the App Store
1. How to download Pre-learned files
To perform image recognition, you must first download the Pre-learned data. The Pre-learned file will be 100Mbyte ~ 250Mbyte, so to start with, please use one of them after checking your own iPhone capacity.
The following three types of the Pre-learned models is available at the moment.
THE COVID-19 Version !

a) https://drive.google.com/file/d/1w9rwbykPx2byGXbZW18e_QQNKl4xrXup/view?usp=sharing
(Target LEPTON infrared image: recognition of car, human, bicycle, large vehicle, sidewalk, dog)
b) https://drive.google.com/file/d/1R5g-cRsdaj98VNCuTg_WN5IFCZe49Xxb/view?usp=sharing
(LEPTON infrared image target: car, human, bicycle, large vehicle, sidewalk, dog + Rock-Paper-Scissors and face)
c) https://drive.google.com/file/d/1QHnHvlRjzGt2qNzyw9eZa2dp-2ujuxRw/view?usp=sharing
(Standard RGB image is targeted: 80 kinds of object detection, test data to confirm how much is recognized by infrared image. This is a general COCO)
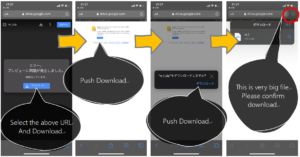
The download method is explained below, but please specify the URL and unzip the downloaded zip file, and then put it in the folder dedicated to Thermal Cam3x.
1.1 Select the download destination from iPhone Safari settings
Change the safari download location to your iPhone internal file. Although iCloud is the standard download location, we recommend to change to iCloud after getting used of it.

1.2 Select Pre-learning data from the above addresses.
First of all, select b).
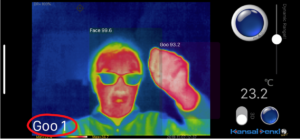
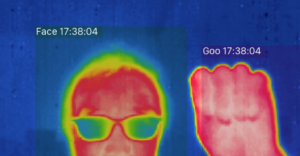
Rock✊-Paper✋-Scissors✌️ of your hand or your face😃 can be detected, good enough to check feature to start with. You can see how to judge the shape of your hand and our model can detect at any angle of your hand. As a feature of the infrared camera, even if a thermal image of a car captured like Web Camera, the target cannot be easily determined. It must realy generate heat. In other words, if it is in the shape of a hand, it can be judged immediately at home, and in order to judge the car, you must go outside and capture the actual cars.
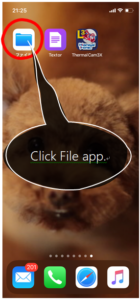
1.3 Open the file app and do the following:
The file app that is installed by default requires some tips. Please try the file copy method in advance.
And then proceed to the following. In particular, it seems to be necessary to practice whether you are in iCloud or in your iPhone internal file.
Select This iPhone-> Download. When the download is complete, you can check w_t.zip.
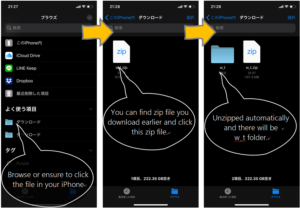
After unzipping, the zip file is no longer needed, so delete it and move the unzipped folder to a folder dedicated to the app (Thermal Cam3x folder).
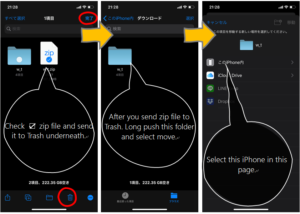
Select the Thermal Cam3x folder and move the w_t folder.
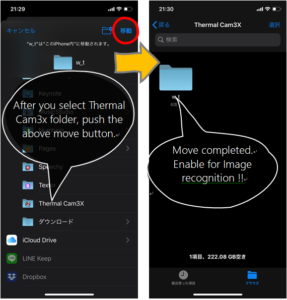
All downloaded folder names will be w_t. You can check one folder and three text files as shown below. Click the w_t folder to check the contents of files such as README. You can also check what can be recognized in the w_t.names file. Although it is possible to extend by editing the text file, editing work seems to be impossible with the iPhone standard application, so it is necessary to work with text file editing application “Textor” etc.
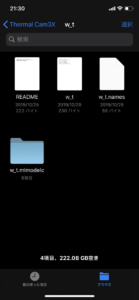
The file contents are as follows. Please note that the extension(.txt & .names) may not be confirmed on iPhone.
w_t.mlmodelc Folder containing Pre-learned files.
Never change the contents.
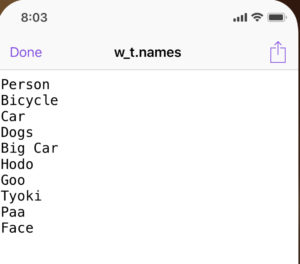
w_t.names
The name of the class is written across the line feed code(/n). The class name of the bounding box is displayed using this name. You can change the name, but please be careful not to change in Japnese(must not be 2bites language) and the total number of lines. Pre-made image recognition models have a limited number of recognitions.
w_t(.txt)
This file sets alerts after recognition and the overall recognition rate (threshold). By changing the parameters in this file, you can change alerts related to recognition results in various ways.
Please confirm “3. Setting method of recognition result alert” for contents and change method.
README.txt
Contains the characteristics of the downloaded learned file.
2. Start image recognition
When selected in Thermal Cam3x settings, Thermal Cam3x image recognition starts.
Normally, when you use the GPU(A13 Bionic) fully, your mobile device gets a lot of heat, but this app does not get extremely hot because it controls the speed. However, avoid walk with running the app in a pocket. In addition, caution as the battery is consumed quickly. When using for a long time, ensure the power supply and use a cooling fan for iPhone.
3. Setting recognition result alert
The figure below is an image of w_t.txt opened on the “Textor” editing screen. This section explains each setting. Do not change the characters on the left-hand side including the =. In addition, it is necessary to enter a numerical value or a character on the right side of =. Please note that the standard value will be applied if a value outside the specified range is entered.
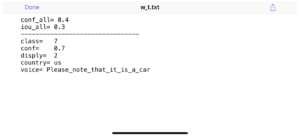
conf_all = 0.4
Set the threshold for the overall recognition rate (all classes that can be recognized). This value ranges from 0.1 to 0.9. Decreasing the number increases misrecognition. The standard is 0.4.
iou_all = 0.3
Specifies the overlap factor of the bounding box. This value ranges from 0.1 to 0.9. Increasing this number will increase the number of overlapping bounding boxes with the same class name and make the image annoying. The standard value is 0.3.

By adjusting these values and adjusting Dynamic Range !! slider, you can focus on the target class. It may also need to be changed slightly depending on the Pre-learning model.
The following settings issue a special alert based on the recognition result for the specified class. Currently there is only one target class.
class = 7
Specify the number of classes of Pre-learned files or 0. The target class number. Specify 1 as the top of the class name written in w_t.names. Enter 0 if no alert is required. In the case shown below, class 7 refers to “Goo”.
conf = 0.7
Enter the target class threshold. When 0.7 is set, it means that alert processing is executed when the target class number 7 has a recognition rate of 70% or more. Specify in the range of 0.1 to 0.99. The standard value is 0.7.
disply = 1 : Class name etc. are displayed at the lower left of the screen.
0: Class name is not displayed at the bottom left of the screen.
1: The number of objects displayed on the same screen as the target class name is displayed at the lower left of the screen.
2: Change the numerical part of the bounding box to the time stamp (standard is the recognition rate display). This setting does not depend on the specified class.
country = us
Specify the type of alert.
ja or us: If the recognition rate is higher than the specified rate, the text written in the Siri voice below will be read out in us=English or ja=Japanese.
So: Abbreviation for “sound”. If the specified recognition rate is exceeded, a warning sound is emitted. Only “whistling” sounds.
Fl: Abbreviation for flash. If the specified recognition rate is exceeded, the camera flash will fire twice.
voice = Plaese_note_that_is_a_car
Enter the text to be uttered when country is ja or us. For English, enter up to 60 characters, for Japanese(2bites), up to 30 characters. it should be sound within 1.5 seconds.
For English, be sure to replace the blank with an underscore(_). If it is set to ja and English is used, English utterance will be non-native.
If you change the class number to 3 in this setting example, for example, if you install the LEPTON terminal behind the bicycle and run the iPhone application, if a car with a recognition rate of 70% or more approaches from the back, Plaese note that is a car !! and iPhone(Siri) will tell you. In the case of ja, “car will come” is also in Japanese. Of course, it’s an infrared camera, even at midnight ! !
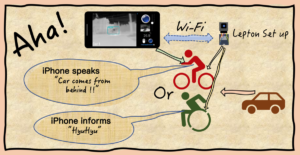
Actually tested … The advantage of the alarm effect was definitely experienced on the narrow roads that are particularly dangerous for bicycles. Actually, the alarm is sounding at the recognition rate of 70% displayed as Car in the lower left. (This is a video at the development stage.)

ADAS(Advanced driver-assistance systems)

PV Solor Panel Error check

When you edit the contents of w_t.txt with “textor” and save it with Done, the settings will be reflected immediately, so find the best alert while changing your setting.
4. How to make YOLOv3 Pre-learned files.
From here, it is for those who have sufficient Deep learning experience and knowledge, and who can use an environment where Linux machines with NVIDIA GPUs can run. The first involves a very complex installation(according to https://github.com/AlexeyAB/darknet), but not much after the second time. The outline is as follows. When you understand the contents, you can improve the efficiency by grouping a series of tasks on the Mac side into Python.
Learning on linux machine-> Copy learned weights file to mac-> Convert to h5 file-> Convert to coreml file-> Convert to coremlc file-> Create three txt files-> Compress to zip
4.1 Annotating LEPTON images and learning
The learning data image uses a file recorded with Thermal Cam3x. Please refer to this page for annotation and learning methods.
YOLOオリジナルデータの学習 – Take’s diary
YOLOオリジナルデータの学習その2(追加学習) – Take’s diary
Please refer to the following URL for further details.
darknet/cfg at master · AlexeyAB/darknet · GitHub
In order to run on iOS, the following settings are required.
Use yolov3-voc.cfg or yolov3.cfg as the configuration file (CFG file).
The size of the input image is limited to with = 416 heights = 416.
The configuration file of YOLOv3.cfg is also explained on the reference page, but it is necessary to change a total of 10 or more locations in relation to the class
Download and use darknet53.cov.74 as the initial weights file to speed up learning convergence.
4.2 Install YAD2K on your Mac.
Create Anaconda environment for python3.7 below and install YAD2K and keras. Each installation method is described at the beginning. However, when installing Keras for the first time, only the Tensorflow installation command is used. Conda install -canaconda tensorflow == 1.14 That is, tensorflow version should be 1.14.
GitHub – allanzelener/YAD2K: YAD2K: Yet Another Darknet 2 Keras
GitHub – qqwweee/keras-yolo3: A Keras implementation of YOLOv3 (Tensorflow backend)
4.3 Convert YOLO learned files using kares
After entering the keras-yolo3-master folder, the following work is also performed in the anaconda environment.
First of all, convert.py is executed, but an error will occur if this is done, so change the 88th line of convert.py to input_layer = Input (shape = (416, 416, 3)).
Next, put the corresponding weights file in the same directory and the cfg file used for learning.
Change the parameter set at the beginning of the cfg file to bach = 1 subdivisions = 1, and create a new h5 file with the following command. Change the cfg and weight file names to the copied file names, and give the .h5 file a name of your choice.
In this example, an h5 file is created in the data folder.
./convert.py yolov3.cfg yolov3.weights model_data / yolo.h5
4.4 Convert files created in 4.3 to mlmodel
Install coremltools provided by Apple
pip install coremltools
Create a new folder (assuming yolo_coreml)
mkdir yolo_coreml
cd yolo_coreml
Create the following python program
In this, please specify the h5 file created earlier for ../../keras-yolo3-master/model_data/FLIR_J.h5 on the third line.
coreml.py
————————————————– ————————————————
import coremltools
coreml_model = coremltools.converters.keras.convert (‘../../ keras-yolo3-master / model_data / FLIR_J.h5’, input_names = ‘input1’, image_input_names = ‘input1’, image_scale = 1/255.)
coreml_model.input_description [‘input1’] = ‘Input image’
coreml_model.author = ‘Original paper: Joseph Redmon, Ali Farhadi’
coreml_model.license = ‘Public Domain’
coreml_model.short_description = “The YOLOv3 network from the paper ‘YOLOv3: An Incremental Improvement'”
coreml_model.save (‘w_t.mlmodel’)
————————————————– ————————————————
python coreml.py
Execution will create a w_t.mlmodel file in the folder.
4.5 Standard is 32-bit data, so if you want to reduce the data capacity, convert it to 16-bit
The 16bit model has a slightly lower recognition rate. To change to the 16bit model, create and execute the following python program.
convert16.py
————————————————– ————————————————
import coremltools
model_spec = coremltools.utils.load_spec (‘./ w_t.mlmodel’)
model_fp16_spec = coremltools.utils.convert_neural_network_spec_weights_to_fp16 (model_spec)
coremltools.utils.save_spec (model_fp16_spec, ‘w_t.mlmodel’)
—————————————————————————————————
4.6 Convert mlmodel to mlmodelc
Compile mlmodel and create mlmodelc file (actually folder). Make sure that the final file name is w_t.mlmodelc.
/Applications/Xcode.app/Contents/Developer/usr/bin/coremlc compile w_t.mlmodel ./
4.7 Prepare 3 more files
w_t.names : The class name file used for learning is used by changing the file name.
w_t.txt : Refer to “3. Setting method of recognition result alert”.
REDME.txt : Name and content are optional and are not actually used. All work files must have the same name, so please enter a description of the data so that you can check it later.
4.8 Move a total of 4 files to the newly created w_t folder
Create a w_t folder and copy the w_t.mlmodelc folder, w_t.names, w_t.txt., and README.txt into it.
4.9 Convert folder to zip and uplode to icloud with your account
Compress the w_t folder to zip. The easiest download location for iPhone is iCloud. Since this Thermal Cam3x folder name is limited to w_t, please manage folders for each model.
Finally
Thermal Cam3x transmits and receives data using OSC, and can communicate with synthesizers using OSC communication, multiple ESP8266s, and computers. This version also supports AI image recognition that allows users to freely use image recognition data prepared by the user, so various ideas using infrared cameras can be realized on the iPhone. In the future, we will continue to strengthen awareness alerts, but I hope that your little ideas will be produced with fun.
* 1: Unfortunately, it depends on the built-in GPU(Bionic chip) performance and cannot be used with iPhone X or earlier models. In addition, it is necessary to download the learned files to a predetermined folder in advance.
* 2: There are three types of test-learned files currently available
* 3: We plan to add more functions in the future, such as sending messages to multiple ESP8266.
